Kimono for KCWC Fall 2012

kimono by saffronbee1
kimono, a photo by saffronbee1 on Flickr.

Fabric used: polyester (the fabric is a gift, i think as it doesn't feel cotton) with Japanese cartoon characters
Pattern used: my own

This is my other attempt of the kcwc fall challenge 2012 - something I am so proud of as I have been wanting to make this kimono for a few years ever since the hotel supplied kimonos to kids for onsen (hot spring) in our stay in Japan.

It's my first attempt to make a kimono for my girl. I remember that the kimono for kids supplied by the hotel was constructed two different simple rectangular shapes. One for the body and one for the sleeves.

I also have a kimono (bathrobe type) for myself. So, I decided to make a mini-version based on my imagination and various pictures from the internet. I also need to consider how much fabric I got and I always want to maximise the fabric I got as there is no right or wrong in lengths and sizes for something like this. So, I decided to go from salvage to salvage as much as I could. After I cut some rectangles and stitched up the shoulders and sleeves together. Hm ... the sleeves were too long because I forgot that the body was quite wide and loose meaning the shoulder parts drape over a few inches over the arms. Time to cut the sleeves short. I think I was pretty successful as I only needed to alter the sleeve lengths (last minute alteration). After the binding and the belt, Ellie put it on straight away with a big smile on her face.

I am also very inspired to make my first pattern for download to contribute to the craft world. I also want to make it a generic one so it will fit a baby to a grown up. If you would like a pattern when it is ready, please leave me your email address. I will email you.

A summer night gown for KCWC Fall 2012

I managed to finish this very simple night gown in the Day 1 and Day 2 of the challenge. This dress was based on the Esprit top again (I made a Pochahontas costume based on the same top as well). So, the "copied" pattern can be reused again for something quite different. Ellie didn't like the big dip in the front. So, I had to make small adjustments. Had I known about the big dip, I would have altered the neck area instead of adding the white fabric in the front. Having said that, this probably makes it "less plain". I used to be quite uncomfortable with stretchy fabric as it had been quite unpredictable. I seemed to have improved over time especially after my "Learn to use the Sewing Machine" module in the TAFE course in Fashion Design that I am doing.  I managed to explore betters seams and length to use at different areas to give better finishing.  Now, I like to sew with this fabric as it is more forgiving. (Best suit not-so-precise people like me). What about you? Do you like to make perfect cutting with non-stretchy fabric or the opposite?

Pocahontas costume

Pocahontas costume by saffronbee1
Pocahontas costume, a photo by saffronbee1 on Flickr.

It's my first ever costume made for my daughter. She had this ice-skating performance that required the West Indies theme. I was told she would need to be dressed as an Indian. Since her song choice was Pochahontas, I looked up from the internet what other people have done for some ideas. I have managed to dig up a yellow fleece fabric off cut my stash. I had to make a trip to Spotlight for some gold fabric. Managed to find this Japanese Tissue Lame in Whitegold colour under $10 a metre. I was going to buy only 20cm of it for these trims but Ellie insisted to buy 30cm. OK. More is better than less. Then, the fun part began with how to draft a pattern. I rummaged her wardrobe a bit and found a perfect Esprit top/dress that I think it will be a good base. So, I folded the top in half and traced the front and the back onto paper. Cut out my pattern. Then, cut the fabric. Lots of trial and error to at the shoulder area to make this one-shoulder top not too low. Ellie must have tried the dress 7 to 8 times that her smile has gone from great big one to not-so-excited one. ;) After I put all the things together, the costume looks real good. I should have put together a pocahontas costume tutorial while I was making it. It would have been fun to record the making process.

I also made the body suit from a lining fabric from Spotlight. The fabric is very stretchy. When the salesgirl in Spotlight asked me if I had a pattern for it, I said "No, but it's all stretchy fabric. It should be ok?". I kind of cut and sew and try on and cut and sew and try on a few times to finish the final product. I think it looks ok especially the spectators are at least 10 metres away. 

Back to the sewing side, I learnt a few things in this project:
1. Japanese Tissue Lame was great and very light but it frayed so easily. I had to cut diagonally in the end. For the wrong cut, I used no-fray glue to save time. Need to look up what else stops the fraying if I will do something similar again. I do like this fabric as it's very affordable.
2. The curve at the front (from the neck to the armpit) was done twice because the length of the seams was not long enough that stretched the fleece too much. Changing to a longer length seam makes the finishing very perfect. Perfect after 2nd attempt. A big pat on my shoulder!
3. I can sew stretchy fabric! Hurrah!

The 448th ...

It's getting warmer in the day but still stays cool at night that it's time to change to different sets of PJs. I am thinking of a simple dress night gown like a t-shirt style and a kimono that covers the morning & night periods. When I was researching kimono pictures on the internet, I came across some really cool hand-made children clothes by their talented mums and found this sewing challenge. I stopped reading blogs nor write for a while now. Let's make a fresh start before the end of 2012. I signed up the kids clothes week fall 2012 by Elsie. I am the 448th person to sign up. What a campaign!

My first guardian angel

My first guardian angel by saffronbee1
My first guardian angel, a photo by saffronbee1 on Flickr.
I was surprised how beautiful this softie was when I made it. I loved all the details, the curves and shapes of this guardian angel. Before I finished this one, I already wanted to make another one for my girl. I don't make dolls or toys normally but now I am thinking that I can just make a few more angels to mind my house (and handy as birthday presents if I could make a few more waiting to be adopted). I wish I could draw and design something so beautiful.

A cap-sleeved top

I normally just borrowed sewing and knitting books from the library without doing anything. However, this is my first time ever to have completed a project within the 4-week borrowing period. Highly recommend this book. The author designed 8 basic patterns. Each basic pattern evolved into 3 different garments. I loved the clothes in the book that I will actually wear. They are so classic (which are sometimes very hard to be found in shops these days).  It also tells you a range of fabric that you can use for the same pattern and suggests other possibilities of the design. Since this is an English translation of a Japanese book, I did wonder whether the size has been adjusted from the Asian size to the American one. I was quite confused even there was measurement of the actual clothing. I did spend quite a long of time trying to figure which size would be good for me or whether it would still be too big as I don't have the body of a model. :D
Simple Modern Sewing
It took me one night to make this top with batik fabric (a gift from Singapore).  Loved the vibrant colours.  It was so simple that I even had the time to make the top with some test fabric to test the instructions and the size as I found it hard to imagine whether it would fit despite the measurement.  I had so much fun making this top and really appreciated the simplicity of Japanese design.  

A cap-sleeved top by saffronbee1
A cap-sleeved top, a photo by saffronbee1 on Flickr.

My own woven labels are another highlight for me. I ordered them in my Hong Kong trip when I had the chance to wander shops that specialised in all sorts of ribbons, elastics, zippers and fabric ...  These labels are made as name tags.  There is a limit of the size of the labels. For a cost at less than  AUD 7 cent each, I was really excited to give it a go and put as much information as I want in the labels.  Can't be happier with the labels.  Now, I can proudly stitched on my own labels for my hand-made clothes.  It came with a minimum of 30 dozen labels.  Hm ... It will take me a lifetime to use up these labels.  ;)
My own label by saffronbee1
My own label, a photo by saffronbee1 on Flickr.

Another alphabet baby quilt

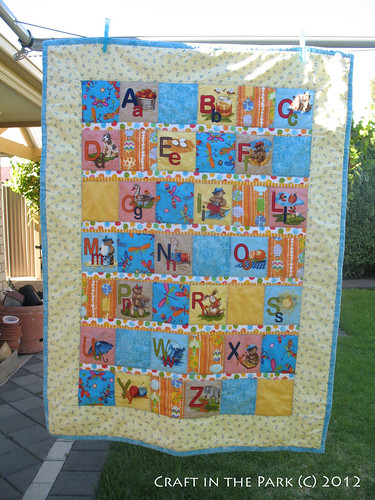
After Hei Hei's quilt, my quilting bugs kept nudging me to make another one. What's better to use up the alphabet panel that gave me a headache. I intended to make something quick and simple. I didn't cut up the panel this time. Just added two contrasting borders around it. The simplest quilt pattern that I can every think of. This quilt is simple and yet very eye-catching. Does it look better than the other one? I have added complexity to the quilt by stippling the whole quilt. I ended up having to use invisible thread for the stippling since there's so much different colour on the panel.

Back to the borders, I do love the whale fabric. Should have bought more!!! It's a beautiful boy fabric that I seldom see. I am pretty the bolt will be gone by now since it was on sale like AUD 7 a metre. This quilt went to my cousin Fung Fung in Hong Kong. He likes reading. Got to check out if he has learnt all alphabets on the quilt. ;)

A alphabet baby quilt

A alphabet baby quilt by saffronbee1
A alphabet baby quilt, a photo by saffronbee1 on Flickr.

I bought an alphabet panel from Spotlight thinking that it would be great for making baby quilts. When I finally wanted to cut up the fabric, I realised the colours were quite different from the ordinary baby colours. Hm ... I knew that I wanted to cut up the panels and add square blocks to make up the centre of the quilt. It took me a while to find matching as well as contrasting blocks for this quilt. Hope my nephew Hei Hei will enjoy exploring the alphabets and the colours of the quilt. It's both educational and practical.

All the windows have open!

My Advent Calendar is looking so good that I will definitely make some more. They will be great gifts. :)

My first Advent Calendar

I am so proud that I made my first Advent Calendar all from recycled materials - Ellie's Christmas cards. We have been keeping all these cards for a few years now. This is one great way to turn them into something that we can use instead of just something to be kept in the cupboard.

The cutest thing about this calendar is that the card sender's signature/name is on every window. Every morning Ellie opens up a window and finds out which child sent her a Christmas card and what the card looked like.

Here are some brief instructions of how I made them:
1. Cut out the name/signature first.  Make sure you leave enough space around all sides as window frames. The border of my windows are 1/4" because I used quilting rulers.
2. Use the cutout name/signature piece as a template to cut out an interesting part of the card.
3. Cut a big "I" on the back of the name/signature piece. Use the back of a knife to score the two sides of the "I" to make it easier to open the window. 
4. Glue the name/signature piece onto the card cutout in step 2. Now you have your first window. Repeat this for the next 23 windows.
5. Glue all 24 windows on a big cardboard (mine is a house shape as I want to make a village if I can make one a year). Any shape will do.
6. Cut numbers from a used calendar and glue the numbers on the windows. It will be good to save a couple of pages from previous months earlier so you can have them all in the same colour.

Voila!! The calendar is done!

I will post a picture when all 24 windows are open.

A bolero

I love this bolero. The pattern is from Debble Bliss's book Junior Knits. I used some inherited vintage yarn Patons Beehive Shetland Chunky (Made in Britain). It looks fashionable enough that Ellie got a compliment every time she wore it. I ran out of yarn at the very end so there was not enough yarn for the ribbing at the sleeves. They were a little bit shorter than the pattern. I also wondered how it would turn out had I used Debbie Bliss Cashmerino Aran as recommended. Would it be much softer and lighter? So tempted to make another one.

Found this detailed note from another knitter. She did a great job!!! Will go through it before I knit it again.

A knitted baby top

This knitted baby top is based on Debbie Bliss's pattern. Since the yarn is different from the pattern used, I had to to do some conversions to fit the tension of my inherited yarn. It also gives a different feeling. I do like the vintage cartoon button. It makes the top super cute.

Another throw

After that mohair throw, my daughter really wanted one for her as well. I was not going to knit for another few months to knit her another fancy one. Among all the inherited yarns, I had no idea what to do with the loopy yarn until the request for another throw came up. Voila!!! I finished this throw (10 balls) in one week with 7mm needles. So quick! Just stocking stitches. Ellie loved it. Thanks Aunt Grace!

A coral project

A coral project by saffronbee1

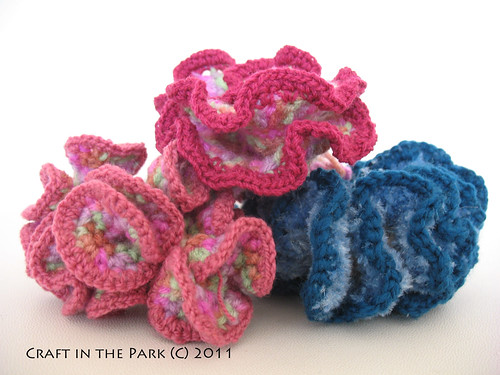
I am in exhibition again!!! How exciting!!! It's SALA festival 2011. RiAus is going to hold a fabulous exhibition of coral crocheted by hundreds of people as there will be really heaps of corals. I really enjoyed making them as it's so free form. All I need to do is to crochet. Unfortunately, I just don't crochet enough for my muscles to get used to it. My right hand became so painful after 5 minutes of crochet. :(

A "remake" bath robe

Ellie finally outgrew her fleece bath robe. When she first wore it, it was down to her ankles. You could imagine how little she was. This robe has been really useful that I have been longing to "remake" one for her.

I bought 1 metre of this fleece of a really cute elephant pattern thinking that it would be enough since it's 150cm wide. After I drafted the pattern from her purple robe, I realised that I didn't have enough material to make the whole gown with this fabric. So, I cut as much as I could except the sleeves which I was thinking I might just use some other colours if thing went wrong. When I finally got to Spotlight which is 2 to 3 months after I bought the fabric, all these fleece materials are gone. That's why the blue came into place. I am so glad that it turned out really well.

I really love this robe as it looked really good, it was very warm and Ellie now wears it every day. It was very easy to make. I used a lot of zigzag stitches instead of straight stitches to give it a more professional finish. The only problem is that I only managed to make it bigger but not longer. :(

Well, it took 1 hour to copy and draft the pattern. Another hour to cut the fabric since I kept fiddling with the paper pattern to see how I could fit everything on the fabric. And then another 2 hours of sewing. You can imagine that I finished everything in 4 nights which is very unusual. ;) Now that I have the pattern, I can always make another one which is loooooooooonger.


My queen size throw

I started knitting this throw from this Erika Knight's knitting pattern a few months ago because I inherited 20 balls of mohair yarn from my aunt. What's a better way to use up all these yarns? I have never knitted anything so big in size. This throw was made up with 4 rectangles of different patterns stitching together and then I knitted the fringe and sewed it around the borders. It's just gorgeous and wonderfully warm. I am so happy that I finished it just in time before it got really cold. My husband kept suggesting to spend AUD300 on a good down quilt. After I made this throw, I'd rather spend that money on raw materials, more fabric and more yarn. It's only a matter of time that I can make something we will treasure of years. :)

I have never knitted lace patterns. It's pretty tricky as I often got lost in the pattern and forgot which row I was on and missed a stitch here and there. Having made so many mistakes, I learnt that it's always good to make a total of number of stitches for each row so you know where you are based on the number of stitches on your needles. This worked wonderfully well with the fringes. For the lace pattern, work out the "trend" in the pattern so that you can count where you are based on the first few stitches in a row. It's not as relaxing as knitting stockinette stitches but the results are well worth the efforts and you will grasp the pattern before you know it.


Souvenir from Singapore

My friend came back from Singapore. She always bought us something from there. I asked for fabric this time. Not knowing what I will get and whether I will get anything. It's definitely a big surprise when I received these gorgeous batik fabric from her. I love the colours and the patterns. So vibrant! It's 100% cotton. Since I had no idea of what batik meant, I googled a bit and found that it's referring to those special patterns. So, I learnt a bit of histories and cultures as well.


Since she lost her luggage at the airport, I made some luggage tags with the batik in return. It's great that she loved the tags. Hope she won't lose her luggage any more.


I also used the fabric to make buntings for Ellie's birthday party. We can now easily throw a party without too much effort in decoration.


I also sewed two shopping bags with the batik as I have way too many ugly shopping bags with company logos on them. I also wanted to make a shopping bag that is light enough to be carried everywhere. Ideally, it could be folded into a small bag. I still can't work out how to close the fold-up bag, whether to put buttons or elastics... What do you think?


I will make more stuff but i think it will be at the end of my very long to-do-project-list. ;)

A revamped bag

I bought this mini-messenger bag a long ago in Kathmandu in sale. I love the size and everything about the bag except the awful brown colour. I finally stitched a piece of bright fabric over the very dull bag. Wow! I got a new bag. Now, I use it every day.

I usually took pictures of what I made at home or in the garden. I just realised that it's very hard to get rid of the colourbond fence as it's everywhere. Ellie and I went to the reserve on our street and pretended that we were models. We took heaps of pictures of each other. Most of them were deleted by my husband as they were too "surreal". I do love the photos and we had sooooooooo much fun.

These photos were inspired by a Japanese lady - Chie Duncan. I recently discovered this Japanese seamstress who has her own online fashion boutique. She showcased her clothes with a photographer in this secret garden collection. I love the pictures and her blog. She recently just posted how to make a poncho top. I think it suits a tall slim person very well. Hm ... it's not me then. :(

Umbrella Prints Trimming Competition 2011

I have been chasing deadlines lately probably because I have over-committed myself. When I was still sewing the party bunting and the organza party bags for Ellie, I was actually working on the Umbrella Prints Trimming Competition at the same time. Her party was on 1 May which fell on the same date as the deadline of the competition. The many ideas that flew by suddenly disappeared. Yet I am still quite happy with what I came up with - two matching T-shirts for me and Ellie for her birthday. :)


More 2011 entries in Flickers. There are some really amazing work - actually artwork. 10 finalists have been selected. Voting here!!! I am so glad that I have entered the competition. It's a fun (although a little hectic) experience. I enjoyed playing around with the trimmings a lot. I guess I will have to keep all my scraps for future projects?

My cushion arrived!

My beautiful cushion cover arrived from Colours in You!!! I loved the beautiful colours and the stitches by hand. They looked so good that I nearly ordered one for each of my friends.   I even thought about getting 12 of those and stitching them together to make a bed spread or a quilt.  It would look pretty awesome too.  Shall I order some more now especially they are running an Easter sale?


For Sale

These origami earrings are now for sale in Irving Baby - which sells some yummy new and vintage fashion and accessories and quirky stuff that you can't think of in the heart of Adelaide. I love visiting shops that stock beautiful things. It's always like I have never spent enough time there.

The earrings look very delicate and elegant on you. I have had so much fun making them. There are 6 pairs in this collection. The earrings are made with sterling silver findings, Japanese patterned paper, Swarovski crystals and Japanese seed beads. The paper cranes have been coated with 3 layers of varnish to make them splash-resistant. The crane symbolizes good luck and peace in the Japanese culture. I used the Chinese red packets - meant to be for good luck and fortune to make the boxes.
Hope they will go to a good home and bring good luck and fortune to those who love them. :)

SOLD

SOLD

SOLD
SOLD
SOLD

SOLD

A mobile phone pouch

I am in love with denim fabric at the moment that most of my projects in the head use denim fabric. This is another one that I just finished. When I bought this beautiful Japanese inspired quilting fabric from Spotlight, I knew that it would be part of a bag or something that I would use. I don't like cutting beautiful fabric. I have to convince myself that it is better to use the fabric than to store them. ;) A mobile phone pouch hardly uses any of the one metre that I got. I will use this gorgeous fabric in my many other projects.

Back to the pouch, it's like making a tailor-made suit for my phone. I first drew the phone on a piece of paper. I then added width to the shape to cater for the thickness of the phone as well as seam allowance. Then, I designed the flap matching the body. Since the pouch would be padded, I used some corduroy scrap that I got as the padding. I didn't want to push my sewing machine too hard. So, the padding was cut without the seam allowance.

Here is the anatomy of the pouch.  I stacked the 3 different layers (like in the picture) all together leaving the flap part for reversing the pouch inside-out.  Then, the most exciting part came.  I put my phone into the pouch.  It fit snuggly.  Perfect!!!  Then, the flap wasn't big enough.  It should have been 1cm longer because of the thickness of the phone plus the thickness of the fabric.  So, I had to undo the velcro on the cover and relocate it.  Then, I stitched the flap together.  Finished!!!

I was going to add a strap that can be used together with the pouch. The idea is that the strap can be strapped onto my arm when I use Endomono to track my workouts.  It doesn't quite work now.  I am thinking that I can use a safety pin to pin the back of the pouch to my backpack until I can think of another solution.


Here are the mistakes that I made in case I will make more pouches like this:
1. Make sure the padding was "ironed" on nicely.  Otherwise, the padding seems to move a little like you wear a few layers of tight clothes and they don't line up quite well from time to time.
2. Make sure the outside of the cover is slightly longer than the inside of the cover for the flap to close nicely.
3. The velcro for the flap should be stitched after the pouch is stitched and reversed.
4. I may design different strap at the back of the phone next time as I was hoping that the strap could be used to strap on to my bags.
5. Use velcro of different size - should be narrower so I can put a longer stretch.

My new pouch for my mobile Nokia E52

Umbrella Prints Trimming Competition

I am going to enter Umbrella Prints Trimming Competition this year.  I haven't even dropped by Nest Studio to purchase a trim pack.  Hm ... It will be this week.  Otherwise, I won't have enough time to make anything.

Today, I just read the competition's FAQ and found out the winner of the previous year and her winning works.  It's very so impressive and inspiring and that I hope one day I can make something like this.  It's absolutely gorgeous and sweet.

Here are the links of her 5 pieces of works for you to "wow" and "ao".

http://lilsonnysky.blogspot.com/2009/07/so-far.html
http://lilsonnysky.blogspot.com/2009/08/one-more.html
http://lilsonnysky.blogspot.com/2010/04/my-creative-blog-space.html

First of all, I guess I need to learn to draw first.  ;)

A tote bag

I have been wanting to use up my fabric scrap. A nice lady at work showed me some beautiful quilts completely made of scrap. So, I decided to just cut all my blue scrap to 3 inches wide and stitch them all up.  I think I got about 2 metres of some lovely long strips that I could use them as bias tapes or something.  I am really in love of denim at the moment and I got metres of denim fabric.  This tote bag was made for taking lunch to work.  I have made it almost the same size as the bag that I have used for lunch boxes.  I added some little compartments for cutlery.   I am very happy with the colour and the way it looks.  The only thing I would have changed next timeis to add some heavy duty interfacing at the straps which should make it "stronger".   Otherwise, it's perfect.  :)  When I showed this bag to the lady at work who showed me the quilts from scrap, she said her Mum just added panels and straps on the supermarket $1 bag.  That makes the ugly shopping bags look one of her own.  How clever!

The inside of the bag in the making ...


My new lunch bag

A "new" old skirt

This project has to be quickest one that I have ever done. One day, I thought this very black classic skirt was just so boring. It needed a little change. Since lace has been very trendy at the moment (hope it still is), I decided to add a little fringe to the skirt to give it a new life. 

First I measured how much lace I would need.  I also thought about covering the whole skirt with lace but I wanted to do something more subtle this time.  Lace along the bottom of the skirt will be just good enough for now.

Then, I stitched the lace onto the hem of the skirt with running stitches thinking that I may undo it one day and put different things on the skirt.


Voila!!! It only cost me 50 cents and 10 minutes. I love the results.


My first ever Artist Pass

I picked up my first ever Artist Pass from Irving Baby last week. I was so excited to show everyone about my pass. I probably will book some discounted tickets for artists. Can't believe that I am art of Adelaide Fringe 2011!!!

Back to the exhibition, I have been there once with my friend Nayth.  I will go there again on Sunday night with Kate and Sue.  I haven't taken my husband and daughter to see it yet.  I am going to see it at least 3 times.  I have asked my husband to take some really good pictures for me.

Trenna said that there have been lots of visits plus a few Fringe group tours.  Lots of positive comments ...


Trenna also prepared and posted the exhibition catalog in Knitting Nancy Dives In website. She has truly done a great job!! I didn't expect that she would need to spend so much effort on it.  Thank you Trenna!!!

Some new ice-skating outfit

I have been wanting to make some new outfit for Ellie when she goes ice-skating.  For so long, I have done nothing.  Suddenly, I finished a few things for her to mix and match. 

Here is a top from Simplicity pattern 3810.  I loved the little rose to make it extra special.


I added a bow with long trailing ribbons hoping that they will fly on the ice.  ;)


This top is my very-proud-upcycled creation.  I was about to throw away this very daggy stained skivvy.  The solid colour of the fabric made me think that I can add some sparkle to it and turn it into an ice-skating top.   (All ice-skating outfit seems to have some sparkles on the fabric).  I kind of pictured that I wanted to get rid of the turtle neck and the sleeves are a bit short and there were some stained area need to be cleared.  So, I cut the sleeves and replaced them with the sparkly fabric (oh forgot what it's called now).  Then, I cut the turtle neck and finished the neck with bias tape made by the same fabric.  Then, I made different yo-yos from the fabric just to cover what I don't want to see.

I cut so much from this skivvy that it now looks completely different.  The yo-yos came in really handy to cover them up.  Instead of giving away her stained top, her skivvy now has a new life and become something that I am so proud of.  :)


The hardest thing was to sew the neck as the layers of fabric was quite thick.  I don't remember how much I pushed my sewing machine to the limit.  I think I ended up hand-stitching the thickest point.


Original


I even used the leftover fabric for a headband. 

How many nights did I spend on this?  Quite a few but I had lots of fun.

A cape for my little girl

I absolutely love this gorgeous cape for my daughter. Mum made it based on the pattern from Make it Perfect during her stay with us. It's really easy to make. With a little translation help, Mum finished it in a couple of hours. I'd love to try the pattern myself but I am more than happy for my Mum to try a modern pattern like this. After all, she used to sew 20 years ago. You can imagine what kind of clothing she used to make. ;)

Since this cape is reversible. She used a wool fabric of Scottish checkered pattern on one side and a 100% waterproof fabric on the other side. It's so practical and so beautiful. Ellie loved it. My friend Nayth now also wanted to make one for her Tessa.


This side view was still "work-in-progress".


I asked Mum to make a label like those designers. It's the first time she used fabric markers. Then, she wrote on some fabric, ironed it and stitched it on the cape. This label is in Chinese meaning "Nana made".  I am so happy that Mum made a piece of clothing for Ellie as well as "signed" it. It will be an heirloom especially Mum lives overseas. It's a shame that she won't be making any clothes when she's back home.

I love this book which shows readers some really practical, do-able and beautiful projects. I am yet to make an Afternoon Tea Jacket from the book for myself. Then, I will think of what next ... (actually I am already thinking of what's next after the Jacket). ;)

Make it Perfect

LinkWithin

Related Posts with Thumbnails